Archive
Setting a Ldap + Samba PDC –
Throughout all my posts, I wrote too much about Ldap Authentication, therefore, Samba won’t stay out of this party.
Remember, this party is by invitation only :)
You could check out my post about Ldap whether you feel confortable or not, whatever, just follow this post and at the end
you’ll be able to set up a Samba as PDC authenticated by Ldap. This example shown here is based on a minimal installation over Centos 5.3.
Firstly, we need to install all required packages by this example, but there are other things to be done like customizing theboot process.
[root@server ~]# for i in acpid auditd anacron autofs atd avahi-daemon apmd bluetooth cups crond kudzu firstboot iptables ip6tables gpm haldaemon hidd pcscd sendmail yum-updatesd ; do chkconfig $i off ; done
[root@server ~]#
Configure /etc/hosts
[root@server ~]# vi /etc/hosts
192.168.1.3 server server.queiroz.com
Turn selinux off.
[root@server ~]# vi /etc/sysconfig/selinux
SELINUX=disabled
Setting up a PDC with SAMBA under selinux and iptables.
Samba is an emulation to NetBios, a kind of maps (names) where Windows through broadcast can talk to each other. Before that
Internet has grown, Microsoft utilized a protocol called NetBEUI to comunicate to others Windows. Throughout this process of
migration, Novel launched Netware 5 with support to TCP/IP while Microsoft was working to improve Windows NT 3.5 to 4. it’s had
support to TCP/IP.
It’s simple as sound. First of all, there are two daemons incorporated. These are smbd and nmbd.
SMBD is a main samba daemon .
NMDB is a Netbios name service daemon.
First of all, let’s give permissions to samba working behind a firewall.
you can get it running system-config-security-tui or increasing the file /etc/sysconfig/iptables. It’s much better doing the
first one choice.
[root@server ~]# system-config-securitylevel-tui
Go ahead customize option and check samba checkbox followed by OK.
How to set up a DNS server master and slave.
DNS stands for Domain Name Services which means to translate computer names to IP Address. On this post, I’ll explain step by step how to set a Primary DNS and a Secondary DNS replicated by the first one. Both of them have an interactively of syncronizing theirs bases. I’m sure how easy it can be, I hope that to be useful for you.
For this example, I used CentOS-5 as base. So, let’s get started!
PRIMARY DNS SERVER SIDE (WEBSERVER01) (192.168.1.6)
1- Install these following packages
[root@webserver01 ~]# yum install bind bind-utils bind-chroot caching-nameserver
2- Configuring bind as cache name server.
Brief summary of the majors options.
listen-on port 53 – This wanna mean that the service will be running at port 53.
directory – it appoints where it will be stored. Remember, when we install bind-chroot, this isolate BIND in a so-called “chroot jail”, which limits access if DNS is compromissed.
allow-query – it allows machines execute queries on this server
Setting up a Squid Proxy Server – playing with ACLs, passwd file and LDAP Authentication
Hello everyone! Today I’ll blog about squid. I wanna play with ACLs, permissions, authentication based on passwd-file and Ldap. It’s gonna have to be thought pretty much before to implement it, but basically I’ll assume that the ideal environment is this one.
Let’s install it. yum is quite a useful tool :)
[root@webserver01 conf.d]# yum install squid
If you take a look at /etc/sysconfig/squid, you’ll see squid starts without dns resolution. It’s just -D as parameter.
SQUID_OPTS=”-D”
How to configure Virtual Hosts with LDAP and file-based authentication over apache2
Hi all folks. Today I’ll blog about Apache + ssl + VirtualHost and on top of all that I’ll describe how to increase the security based on ldap authentication and password file authentication.
It might be done either installing just the packages which are missing like below,
[root@webserver01 ~]# yum install httpd openssl mod_ssl mod_ldap
or you can try this way.
[root@webserver01 ~]# yum groupinstall WebServer
An Overview of some of the following options.
FollowSymIndex, AllowOverride(None, All, AuthConfig), include, indexoptions, order, allow, deny, DOcumentRoot, ServerAdm, ServerName, AddType, KeepAlive (keep number of conecctions, by default is off.)
FollowSymLinks allows the webserver to use symbolic link.
AllowOverride is related to directory security. It allows you to define a .htaccess to a directory. It can be defined as All, None also Authconfig.
Order defines the access order. it can be Allow and Deny.
include is useful to import others archives. if you wanna import ssl.conf file to httpd.conf, it’s just use include ssl.conf. anything else more than that.
indexoptions is an options that allows you to assign and define an order to index. you can include index.php, index.html. From the moment on a request to some directory and this directory contains one of these ones it will be loaded.
ServerName is a server which responses to this webserver. you can recognize an IP or host named-based.
DocumentRoot means Where are stored the files.
KeepAlive Keep a number of conecctions persistent (more than 1 conecction per user) and by default is off.
Review /etc/hosts, it needs looking like this. I’ll describe to set it up through hosts-based instead of a dns service.
192.168.1.3 webserver01 http://www.test1.com http://www.test2.com
It coud have been set up from the beggining using DNS servers, but don’t be angry, I’ll post something looked like it using bind.
Setting up a Ldap directory service – step by step.
I’m gonna blog and demonstrate in facts how to configure and administrate a LDAP directory services.
Actually, Ldap is a directory service which informations can be stored as a database and through these ones you may recognize you base authentication. This turns out that you could authenticate an user for multiples services.
We’re working over the following picture throughout the steps, where it indicates all our ldap tree.

picture1
Setting up a NIS server over CentOS5 working under nfs
Server side: Preparing
The /etc/hosts has to be like this. (you can replace the domain to whatever you desire, but on this exercise it was defined as “queirozpacheco.com”.
[root@server ~]# cat /etc/hosts
192.168.1.13 server server.queirozpacheco.com yum.queirozpacheco.com
192.168.1.14 host host.queirozpacheco.com
[root@server ~]#
Connecting host via ssh – let’s make the things turning out much easier for us.
[root@server ~]# ssh host
root@host’s password: (press ctrl + C)
So, in this step, press Ctrl + c and send the key pub generated by the server to the host client.
[root@server ~]# cat /root/.ssh/id_rsa.pub | ssh host “cat – > /root/.ssh/authorized_keys”
root@host’s password:
The server doesn’t ask for any password to grant access to you.
[root@server ~]# ssh host
Last login: Mon Feb 22 21:24:17 2010
[root@host ~]#
Client Side: Preparing.
[root@host etc]# cat /etc/hosts
192.168.1.14 host host.queirozpacheco.com
192.168.1.13 server server.queirozpacheco.com yum.queirozpacheco.com
[root@host etc]#
Growing a Raid 5. It has never been easier.
Add a new disk and prepare it with 3 partitions 6GB of size as well as the file system type as “fd”. It has to be like this: you can create whatever size you desire, it doesn’t matter. On one condition: It must have the same size to others partitions else of your array.
[root@carlosqueiroz ~]# sfdisk -l /dev/hdd
Disk /dev/hdd: 41610 cylinders, 16 heads, 63 sectors/track
Units = cylinders of 516096 bytes, blocks of 1024 bytes, counting from 0Device Boot Start End #cyls #blocks Id System
/dev/hdd1 0+ 11905 11906- 6000592+ fd Linux raid autodetect
/dev/hdd2 11906 23811 11906 6000624 fd Linux raid autodetect
/dev/hdd3 23812 35717 11906 6000624 fd Linux raid autodetect
/dev/hdd4 0 – 0 0 0 Empty
[root@carlosqueiroz ~]#
Setting a Raid5- the party hasn’t finished.
Let’s check out the survey below. We can find here two disks and one of them there’s no partition created. This one will be our raid. I’ll define 3 partitions
of 6 GB each of them. How smallest is the size of that, Less is the waiting time to create the array, I mean, you can spend some time on it. As it is an example, I’ll set all of these partitions as 6GB.
[root@carlosqueiroz ~]# fdisk -l
Disk /dev/hda: 10.7 GB, 10737418240 bytes
255 heads, 63 sectors/track, 1305 cylinders
Units = cylinders of 16065 * 512 = 8225280 bytesDevice Boot Start End Blocks Id System
/dev/hda1 * 1 13 104391 83 Linux
/dev/hda2 14 102 714892+ 82 Linux swap / Solaris
/dev/hda3 103 1305 9663097+ 83 LinuxDisk /dev/hdb: 21.4 GB, 21474836480 bytes
16 heads, 63 sectors/track, 41610 cylinders
Units = cylinders of 1008 * 512 = 516096 bytesDevice Boot Start End Blocks Id System
[root@carlosqueiroz ~]#
RAID I – from a normal file system. This party is by invitation only :)
As we can see, the survey found is a simple server installed to use normal store file system.
[root@carlosqueiroz /]# fdisk -l
Disk /dev/hda: 10.7 GB, 10737418240 bytes
255 heads, 63 sectors/track, 1305 cylinders
Units = cylinders of 16065 * 512 = 8225280 bytesDevice Boot Start End Blocks Id System
/dev/hda1 * 1 13 104391 83 Linux
/dev/hda2 14 1215 9655065 83 Linux
/dev/hda3 1216 1304 714892+ 82 Linux swap / Solaris
[root@carlosqueiroz /]#Check out how mount points are.
[root@carlosqueiroz ~]# df -h
Filesystem Size Used Avail Use% Mounted on
/dev/hda2 9.0G 969M 7.6G 12% /
/dev/hda1 99M 12M 83M 12% /boot
tmpfs 172M 0 172M 0% /dev/shm
[root@carlosqueiroz ~]#
Installing a server based on LVM on Centos 5.4
This new generation gets over all what I’ve expected. When I was gonna resize a partition I used to do this task either partition magic for Windows or resize2fs for Linux ext3 file systems and sometimes it was resized for breakfast, don’t misunderstood me, but it’s not definitely the most safe way to resize partitions. I know there are many ways to implement it, but for now I’m running for LVM :P
Today there are many tools available to resize a partition, however when we’re talking about a critical server in output which it has incorporated raid and unstoppable services, we need to design better how the information will be stored as well as implementing a file system more dynamic.
Here are the steps for installing a server based on LVM.
Applying quotas on Linux file systems.
Some reasons to set up a quota disk on your server. I’ll tell some of those on the most basic way to be understood.
You could manage from the beginning the space in disk on your server applying quotas. It allows you to fix a disk quota for some user and group. It’ll determine how the size leftover a certain user could be stored.
I’ll post step by step, how to configure file systems using disk quota.
For now, we’ve got our partition disk configured like this: You definitely don’t need to follow this partition layout of course but it’s recommended apply quotas in a partition independent from root file system, although it allows you to do it.
Installing rpmforge repo over Centos 4.8
That can easyly be downloaded and you can do it throught this link below.
#wget http://packages.sw.be/rpmforge-release/rpmforge-release-0.5.1-1.el4.rf.i386.rpm
once you’ve got it, type:
rpm -ivh rpmforge-release-0.5.1-1.el4.rf.i386.rpm
Here you are. You’re ready for using this repo. I’d give some tips about that. I’d install fluxbox window manager.
# yum install fluxbox xorg-x11-xinit xorg-x11-server-Xorg
Bye for now.
Setting up a zope plataform server over Centos 4.8
Well, early I’ll post how to make a similar step under a FreeBSD system, but for now I’ll give to everybody who follows my blog a brief summary over such steps.
This steps consist besides installing a platform Zope, we’re gonna install Mysql Database and their such modules for connecting from Zope interface to Mysql Database.
So, let’s get started.
1- Install Mysql Database.
[root@darth-maul ~]# yum install mysql mysql-server
Setting up Install Process
Setting up repositories
Reading repository metadata in from local files
Parsing package install arguments
Another yum’s troubleshooting. Cannot find a valid baseurl for repo: update
According to Centos 4.8, once installed by rpm a package called rpmforge, it came up this error after running yum update command.
#yum update
Cannot find a valid baseurl for repo: update – Error
I found this somewhere unknown and I decided to blog it just in the case where someone needs getting this. I hope that could be useful.
Follow this steps and good luck.
#rm /dev/urandom
#mknod -m 644 /dev/urandom c 1 9
#yum clean
#yum update
Cheers.
Error yum update File “/usr/bin/yum”, line 29, in ?
On these days ago, I’ve been trying to make an update in my yum repo. So I’ve got the server behind a proxy connection. I’ll report this error just either if one day I by chance forget or anyone else needs it.
# yum update
…… >> checking all the updates and settings the correct files for updating (no mirror problems!), then I get:
Traceback (most recent call last):
File “/usr/bin/yum”, line 29, in ?
yummain.user_main(sys.argv[1:], exit_code=True)
File “/usr/share/yum-cli/yummain.py”, line 229, in user_main
errcode = main(args)
File “/usr/share/yum-cli/yummain.py”, line 145, in main
In my /etc/bashrc was looking like:
export http_proxy=10.0.0.1
but the right way is:
export http_proxy=http://10.0.0.1:3128
Cheers!
Setting Internet connection to Shell Linux behind a proxy.
On this last days I needed installing some staff in some server and in fact it hasn’t been immediately. The server was behind a proxy Internet connection.
So, here you are the steps for configuring a proxy at your linux environment.
It depends which distro you are working on.. But the concept is basically to export 2 variables to the environment shell. You can get it from several ways. I’ll quote one of those.
1- Firstly open /etc/bashrc or ~/.bash_profile or still ~/.bashrc
2- At the end of file or wherever you want, put these lines in:
export HTTP_PROXY=http://username:password@proxyserver.net:port/
export FTP_PROXY=http://username:password@proxyserver.net:port/
3- Once it has put them, quite saving and login again.
Cheers.
How to allow a certain user to execute sudo commands without typing the root password
Okay, another useless thing, but who knows some day it can become useful.
1- Edit /etc/sudoers
2- Type into a new line: user ALL=NOPASSWD:ALL, that would be like this:
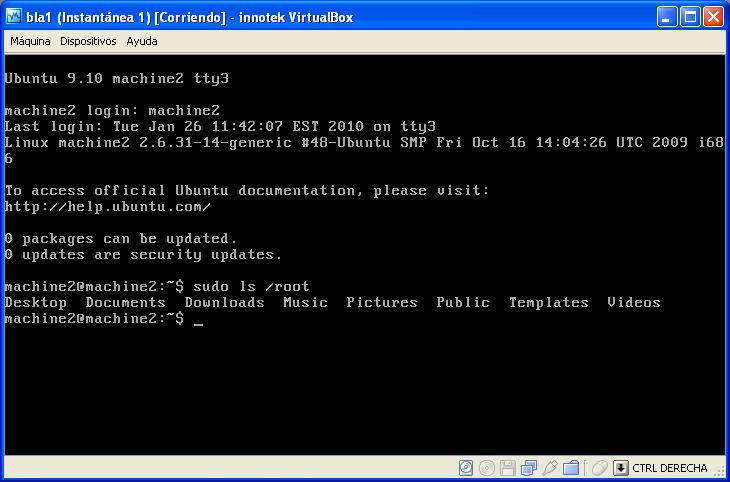
Note that our user is called by machine2.
3- Exit
4- Logout from your session and try to login again with machine2 user. Then execute a command through sudo. You’ll notice that doesn’t ask it for a root password.
Setting a user without password.
Hey men!! How are you doing? I’m gonna write about users and its way of login.
There are many ways to access to the system and some reasons to implement one of those below.
On These days a big friend of mine asked me if I knew how to take the password out of a user. In other words, He didn’t want password builting into a user.
Great, It seemed to me a bit strange but I’ll post if anyone else would by chance need to implement it.
1 – open through vi command the file /etc/passwd
2- search for the user line.
3- Cut the “x” character out.
4 – Then save the file while get out of here :wq

